Italian Herbed Artisan Bread


This Italian Herbed Artisan Bread is delicately flavored with the hints of Basil, Garlic, and just the plain yeasty deliciousness that can only be found in bread.
Pop…Snap…Hiss…Crick…Crunches…Splintering…Crackle!! These words rumble round and round my head to the ferocity and syncopation of “Cell Block Tango” from the musical Chicago every single time I bake this bread, its rhythmic snaps and crackles driving home the anticipation of some of the best and perhaps better yet, easiest bread I have ever baked in my life. It is astonishing at how simple and no fuss this method is, and honestly, it is slightly upsetting to know I could have been happily consuming fresh baked bread my entire life that is so incredibly crusty, chewy, and delicately flavored all in the same mouthful.
Bread is one of those things that it is incredibly easy to think of as ho hum, middle of the road little bookends for a mundane midweek lunch. For the majority of us busy folks, this often means the bread found in your local grocery store, chalk full of preservatives and extra air and chemicals to make them last a bit longer to be more cost efficient to the manufacturer. Because let us face the ugly truth - homemade bread has a ticking time bomb hanging over its shelf life if you do not consume it quickly. And for practical purposes, it makes sense to utilize the bread that is designed to last longer to assist in making your food preparation just a bit more manageable during the week.

Using a Spatula will help get the extremely wet dough out of the bowl, and then you can easily shape the loaf with well floured hands and a well floured work surface.
However, this little beauty is going to blow all preconceived notions of bread baking out of the water. Banish the days of a week to start a Sourdough starter before you can even attempt to bake a loaf, never mind the fact that that finicky little starter is so gosh darn needy and requires re-feeding every.single.day. Scoff at the meticulous process and attention to detail adapted by the Italians for fussy Ciabatta bread, and embrace the insidiously effortless little crusty loaf of Italian Herbed Artisan Bread I am about to offer you.
One of the tricks and wondrous scientific processes that create that perfect crunchy, crusty exterior of a great bakery loaf of bread is the addition of steam. French Baguettes have that distinctive exterior due to the high amount of water in the bread dough and the amount of steam that is created from both the baking process in high heat. Bakers can also employ a method of either manually spritzing the baguettes while baking or adding a pan of boiling water to the oven to help keep the baking environment decidedly moist and humid. There is also a considerable rise time, assisting the yeast in expanding and forming the gluten for that distinctive chewy texture and big air holes in the loaf.
This method of recreating that wonderfully chewy texture of without multiple rising sessions and kneading sessions is to allow the initial ingredients to sit and rise for a minimum of 16 hours (and the rise time can be as long as 24). Because the yeast has such a long time to grow, feed, and expand, it allows the little gas that is released in their multiplication to get trapped in the dough - allowing it to become very light and “fluffed” up. There is a good amount of water in this dough, so it is pretty sticky to work out of the bowl, but the use of a Spatula will help. When you bake this little masterpiece, however, is when the real magic happens. You bake it, covered, in a Dutch Oven, creating a nice, humid little environment to help create steam. Then, you remove the lid of the Dutch Oven and finish the bake time, allowing the exterior of the bread to brown and finish baking through. Once you remove the magic bread from the Dutch Oven to cool on a wire rack, listen to the little melody of crackles and hisses the bread sings out as the crust hardens in the abruptly much cooler temperature.

Score the top of the loaf before gently and carefully placing into the very hot Dutch Oven. I use Parchment Paper, already placed in the pot before heating, to assist with easy removal of the loaf after baking.
My version of this No Knead method of bread is delicately flavored with dried herbs and some spices. I add these in with the flour so the dough has time to absorb and meld all those flavors overnight. I have tried this with the majority of the herbs and a bit of cheese added just before baking, and the high heat of the oven incinerates the combination too much to have the flavor be subtle and even. The Italian Herb Seasoning typically includes Basil, Marjoram, Parsley, etc but I find it easier just to use the blend and then add additional Basil to perfume the dough even more. The Granulated Garlic and Onion Powder are super subtle in flavoring the dough, but add complexity and depth without taking away from the yeasty, almost floral flavor that only a yeasted bread can achieve.
This bread is the perfect accompaniment to soups, pastas, or as I just ate it last night for dinner, simply sliced with a nice schmear of salted butter. It would be terrific sliced and used for a fancy pants sandwich, but I think it also makes the base for a great homemade crouton when its starting to lose a little life. Literally, all you need to do is get the dough percolating right before you go to bed and when you get home, bake the best loaf of homemade bread in your life the next day. Totally worth it, and no excuses not to try something THIS easy.
*I have not forgotten about the Chicken Parmesan Recipe. It is coming, but I got overly excited about this bread AND it is the perfect accompaniment to the pasta. So it is appearing soon, and then you can pair the two together :)
**My loving seeing eye husband found the back of my earring and they are safely back in my ears where they belong!!!!
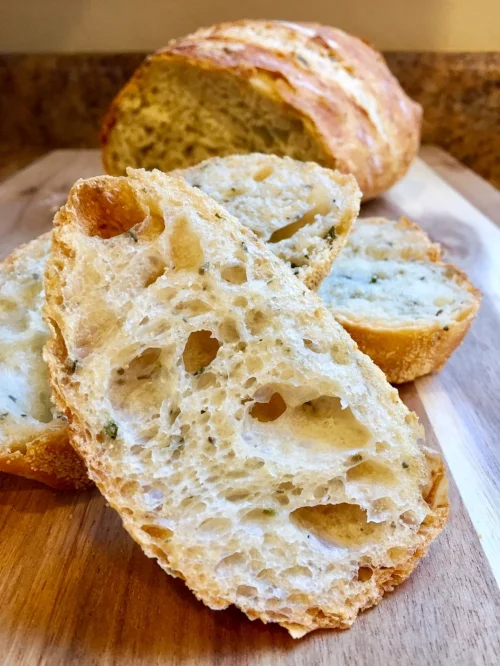
Deliciously crusty on the outside, with that distinctive chewy texture that a great Artisan bread gets from high temperatures and steam.
Italian Herbed Artisan Bread
Author: Iris Anna Gohn
Servings: 1 medium loaf
The original creator of this method is Jim Lahey. He published a recipe for this back in the day in The New York Times and I was SO LATE TO THE GAME of discovering this method.
I find that using the Parchment Paper takes a lot of fear of burning my hands out of the equation. I have baked this both with and without Parchment Paper, and honestly using it made no noticeable difference in the final texture of the crust. Plus, added bonus, clean up was so much easier as I did not have to scrub out the Dutch Oven for all the little Cornmeal Granules that got baked to the bottom of the pot.
I have used both All Purpose Flour and Bread Flour in this recipe, and I prefer to use Bread Flour as it yields a slightly chewier texture, in the best way possible. I find the most consistent results come from King Author Flour. If all you have on hand is All Purpose flour, that will work fine as well.
Keep this stored in an airtight container or a big Ziplock bag. It is best on the first day, but if you happen to have leftovers and want them to be just as good on day 2, spritz a little water on the top of the loaf and rejuvenate it for a few minutes in the oven the next day.
Ingredients
- 3 Cups Bread or All Purpose Flour
- 1/2 Tsp Active Dry Yeast
- 1 Tsp Sea Salt
- 1 1/2 Tsp Dried Italian Herb Seasoning
- 1 Tsp semi dried Basil (I used this brand)
- 1/2 Tsp Granulated Garlic
- 1/4 Tsp Onion Powder
- 1 1/2 Cups Water, warm or room temperature
- Extra flour for shaping loaf
- Cornmeal, optional
Directions
To Prepare the Dough:
- In a large bowl, whisk together the Flour, Yeast, Salt, Italian Herbs, Basil, Garlic, and Onion Powder.
- With a wooden spoon, make a well in the center of the flour and pour the water in. Stir everything until a sticky, shaggy ball of dough forms.
- Cover this ball of dough thoroughly with plastic wrap - have the plastic wrap touching the dough rather than just over the surface of the bowl itself. I end up using two different pieces of plastic wrap to ensure it is covered properly.
- Let covered dough rest for a minimum of 16 hours in a warm, dry environment.
To Bake:
- Line your Dutch Oven with Parchment Paper, ensuring there is overhang on all 4 sides with the points protruding out from under the cover when the lid is secured on top.
- Remove the top rack from your oven and place the covered, parchment lined Dutch oven in the oven. Preheat to 450 F for a half hour.
- While the Dutch Oven is preheating in the oven, generously flour your workspace where you plan to shape the dough - either the counter itself or a cutting board.
- With a Spatula, gently coax the very fluffy, sticky dough onto the floured surface. Dust your hands with flour and the top of the dough as well, and very gently shape into a ball. Cover with plastic wrap and let rise again for 30 minutes.
- When the dough has risen and the Dutch Oven has been heating in the oven for at least 30 minutes, remove the Dutch Oven and carefully take off the lid. Sprinkle Cornmeal into the Dutch Oven.
- Take the plastic wrap off the dough and quickly score the top of the loaf 3 to 4 times with a sharp knife. This will help the dough rise and expand in the heat.
- Gently place the dough into the hot Dutch Oven with the scored top facing upwards to the ceiling. It is fine for the loaf to lose some of the perfectly round shape as it will expand and rise while baking.
- Secure the lid (careful, it’s hot!!) back on the Dutch Oven and bake for 30 minutes, covered.
- After 30 minutes have passed, remove the lid from the Dutch Oven and bake for an additional 15 minutes. The bread will sound hollow when thumped, which means it is done.
- Very carefully lift the bread out of the scorching hot Dutch Oven with the help from the Parchment Paper. Let cool on a wire rack at least 15 minutes before cutting into it as this will allow the crust to Harden and develop that great crunch - you will hear it crackle and snap as it cools!!!