Soft Grinder Rolls


Pillowy soft inside, subtly sweet, these Soft Grinder Rolls are SO much tastier than the ones in sandwich sub shops.
Possessing numerous OCD tendencies can be both an advantageous quality to have as well as an indescribably irritating one. When you are in the process of learning a new skill, the repetition is definitely an advantage as it integrates muscle memory, technique, and figuring out tricks to make the process smoother. Baking bread has been one of those skills I have been developing and honing these past couple years, and there are more often times than not failures in getting yeast to work the way you want it to. Soaking up all the information out there from more experienced bakers has been eye opening, even when applying the techniques and ratios you think will work, then have the results be not quite what you were expecting.
Case in point. This recipe I developed for these Soft Grinder Rolls. I am obsessed with sandwiches, and though I adore my trusty Fluffed Up Kaiser Rolls and Classic French Bread recipes for excellent bases to some delicious sandwiches, I wanted to create something that was a cross between a Subway Grinder roll and a Firehouse Sub roll in terms of texture, lightness, and shape. I had a feeling I would have to delve out of the more plain recipes for bread doughs and into the enriched bread doughs, which was intimidating. Adding additional fats and different types of liquids to the dough was daunting, for even though I knew the results could be tasty I did not know how the different ingredients would react with the yeast.

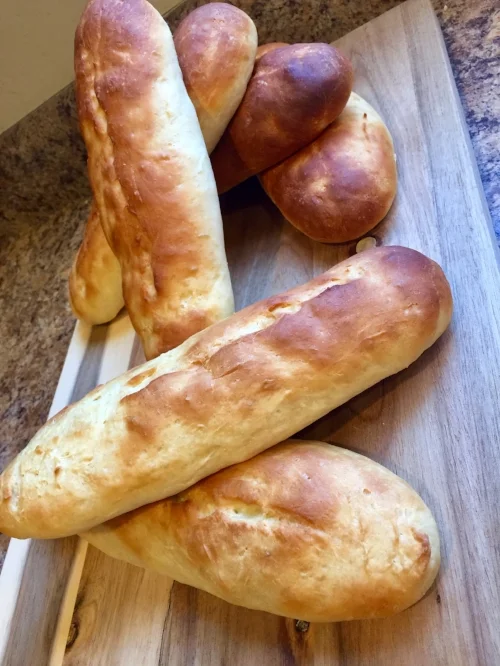
Soft Grinder Rolls beginning their rising, depending on the ambient temperature of the room it can take between an hour and an hour and a half.
Attempt number one yielded a batch of softer rolls with a more creamy taste, but I was not quite satisfied with the balance of salt and sugar flavors. I also was not pleased with the rise - it rose well, but I had a feeling it would rise more out than up if the rolls were spaced further apart on the sheet. I fiddled with some ratios, and decided to add eggs to help with the structure of the bread while rising.
Attempt number two yielded a very soft texture, with the bread having slightly floral notes from the honey I chose to add as the sweetener. The eggs definitely yielded a better rise to the bread, but the direction of the rise was more outward rather than straight up towards the sky. This batch of dough was definitely wetter, which I felt attributed to the fluffiness however I found it kind of difficult to work with because it was so sticky and I strongly suspected that I would need a special silicone mold to help the bread keep its shape while it rises and bakes. (Note, this is how the famous Subway bread rolls become so uniform - they use the Silicone bread molds to help the subs turn out to be incredibly uniform in shape and size).

Reminiscent of a slightly less sweet King's Hawaiian Roll, these Soft Grinder Rolls have more depth of flavor due to the milk and honey used.
At this point of the recipe development process, I was sick of eating Grinders for every meal. My husband is a trooper and while I know he prefers something a bit more traditional for dinner such as a protein, vegetable, and starch, he did not complain when all of a sudden the only thing on the menu was different variation of grinders. Think breakfast grinders with eggs, BBQ chicken grinders, turkey grinders, and plain PB&J grinders. So I did yet MORE research before testing batch number 3, on figuring out yeast to flour ratios more precisely, adjusting rising times, and adjusting the number of rolls in a batch and their shape. I was quite determined to make this recipe turn out the way I envisioned it in my head - something that had great flavor, slightly sweet, the texture extremely soft, but NOT needing any special tools for shaping. My OCD tendencies had fully kicked into gear and I was obsessed with getting it right. It really bothers me if I settle for something that is sub-par, and the thought of “pretty good” was just not going to cut it.
I should also note here that my husband (actually, more often times than not my cats as they are home during the day with me) has seen me throw a few sulky snits because something has not turned out the way I want it to. There may have been some instances where I temperamentally have chucked sub-par cookies or breads in the bin. I very vividly remember tossing an entire batch of my Honey Chai Snickerdoodle Cookies out when they were in development, angrily proclaiming “These are just Sugar Cookies!! Where is the Cream of Tartar TANG?!?!?!” Usually though, while recipe testing (especially for baked goods) I have a friend or two I can send home with the testers to get feedback. I only throw my fits if the result is REALLY out of left field in terms of what I was expecting.
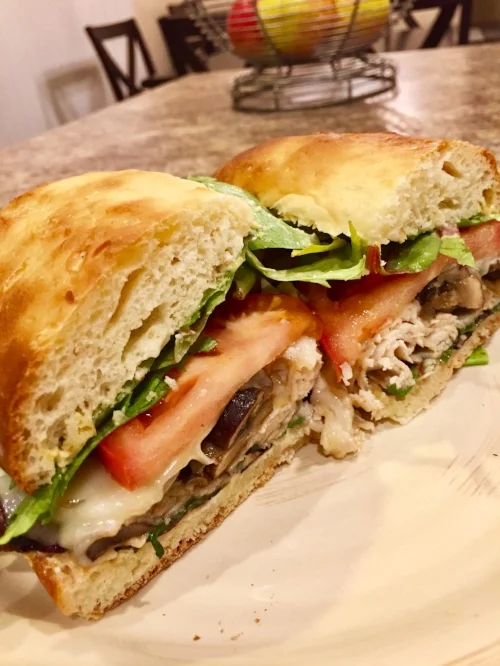
The perfect bread to filling ratio is achieved with these Soft Grinder Rolls. This re-creation of a favorite sub shop grinder contained sautéed Turkey, melted Havarti, succulent mushrooms and caramelized onions, juicy tomatoes and crisp lettuce. Dijon mustard and mayo rounded out the sgrinder - totally delicious.
So batch test number 3 was critical. I was about to put this recipe on hold for growing frustration and the overabundance of Grinders being consumed. I was determined to get it right - exactly what I wanted, and I am pleased that this is the final recipe that produced the results I was exactly looking for. These Soft Grinder Rolls have a lovely torpedo shape, are very pillowy ad fluffy inside, and the floral notes from the honey used are perfectly balanced. Using milk added depth and creaminess to the finished product, and these rolls are so SOFT and SUISHY, which is exactly what I wanted. These Soft Grinder Rolls are a perfect base for those big, sub style grinders, and you can use them in anything from a meatball grinder to an Italian style grinder with cured meats and pickled hot peppers. I would not recommend this bread for something like a Vietnamese Bahn Mi, as the outside crust is SO soft it does not offer that great crustiness a good Bahn Mi sandwich requires to be truly great.
With cooking, I find much of the time the food tends to be pretty forgiving in transforming something mediocre to something great. This is not the case with baking, and especially working with something like yeast in breads. Those little yeasties sometimes have a mind of their own, and figuring out ways to tame them is both delightful and devastating in one fell swoop. My OCD tendencies made this recipe triumphant, and now I can put it into the rotation of my staples for the future
A new staple bread in my life, these Soft Grinder Rolls are the perfect base for soft, deliciously fluffy, bread for the base of your favorite grinders.
Soft Grinder Rolls
Author: Iris Anna Gohn
Servings: 8 Grinder Rolls
With all things considered in the world of bread baking, this recipe is not overly complicated. It only has one rise time, so once you’ve shaped the grinder rolls and loosely cover them you’re pretty much set before you put them into the oven to bake.
I found with my experimentations you can heat the milk, butter, and honey together in a small saucepan rather than adding things separately. To me, there was not a big enough difference in the finished product to warrant adding the honey and butter at separate stages. It is important, however, to make sure that you do not add the yeast into very hot milk as it will kill them dead almost instantly. I heat the milk, butter, and honey over a very low flame and consider it ready when the milk is just warm when you put your finger in to test it. It is better to err on the side of having the milk be a little cooler - the yeast will still fluff up, it’ll just take a little longer.
These Grinder Rolls are really best the day of baking, but will last up to 3 days on the counter before I feel they get too stale. You can combat this by either freezing some of the rolls if you do not plan on using them straightaway, or you can transform them into baked grinders or toast the bread in a pan with a bit of butter on the cut sides to rejuvenate it.
Ingredients
- 1 1/2 Cups Warm Milk
- 2 Tbsp Salted Butter
- 1/4 Cup Honey
- 1 Tbsp Active Dry Yeast
- 2 Eggs, whisked
- 5 Cups BREAD Flour
- 1 1/4 Tsp Sea Salt
Directions
- Preheat Oven to 450 F. Line two baking sheets with Parchment Paper and set aside.
- In a small saucepan over low heat, combine the milk, butter, and honey. Heat the milk mixture until it is just warm - when you stick your finger into the milk it does not scald you nor feel freezing cold anymore. DO NOT BOL THE MILK mixture as this can kill the yeast if you put it in too soon as the temperature will be too hot for them to flourish.
- Once the milk mixture is warmed, transfer it into a large mixing bowl and sprinkle the yeast on top. Mix in the yeast, and let sit for 5 to 10 minutes until it gets nice and foamy.
- Add in the flour, salt, and whisked eggs and slowly stir the mixture until the wet ingredients are mostly incorporated into the dry.
- Generously flour your workspace and tip the shaggy dough onto it. Knead the dough for 7 to 10 minutes, until a smooth, elastic, and slightly sticky dough has formed. Depending on how sticky the dough is, you may add a little extra flour to help keep the dough from cementing to the kneading surface. The dough will feel a bit softer than Play-Doh that’s fresh.
- Divide the dough into 8 equal size pieces. Roll them, one by one, out into a long, skinny rope, roughly about 10 to 12 inches long. Space out each piece of dough on the baking trays evenly, 4 grinder rolls to a tray.
- Gently score the top of each roll lengthwise down the center of the roll - this will help the dough expand and rise during the rising period. Loosely cover each baking tray with a damp towel or plastic wrap (I find plastic wrap to work well for me) and let rise until doubled in size, roughly 1 hour to 1 and a half hours. Because my house is cold, I let my bread rise on top of the preheated oven to foster a warm environment.
- Once the dough has doubled in size, very carefully remove the plastic wrap and bake for 15 minutes, rotating the baking sheets halfway through to ensure even browning on top.
- Cool on wire racks and store in an airtight Ziplock Bag or freeze for up to 2 months.